Remote Desktop Connection
All ARE Windows computers are setup for Remote Desktop Connection. A Remote Desktop Connection allows you to access and control your office computer from any other computer, on or off campus. This is a function primarily for users of Windows PCs, although you can connect from a Mac to a Windows machine using the Remote Desktop Client for Mac (V10).
You need to know the hostname of your your computer, this is printed on a physical sticker on your computer, if you cannot locate it, here is how to find it in Windows 10.
- Open the Control Panel.
- Click System and Security > System.
- On the View basic information about your computer page, see the Full computer name under the section Computer name, domain, and workgroup settings.
Connecting away from campus’ network
If you are not on campus’ network, you will need to use Cisco AnyConnect VPN client, you can download the latest version if you do not have it here. This is pre-installed on all ARE Laptops and available in Software Center. Directions on how to use VPN client can be found here
Windows
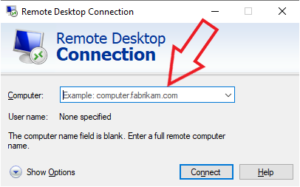
- Search for Remote Desktop Connection in Windows
- Input the hostname of the computer you are trying to connect to

- If you are using a personal computer you will need to specify that you are logging into WOLFTECH (no brackets)
- Username : wolftech\<unityID>
- Password : <your unity ID password>
Mac OS
- Launch Microsoft Remote Desktop V10 (available via Self Service)
- Click + icon and Add Pc
- Input the hostname of the computer that you are trying to connect to in PC Name box hit add
- Specify that you are logging into WOLFTECH (no brackets)
- Username : wolftech\<unityID>
- Password : <your unity ID password>
Multiple Monitors
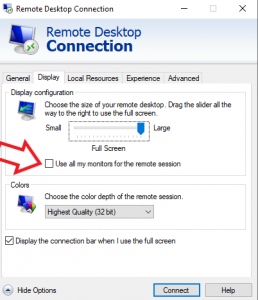
If you connecting from a dual monitor system , you are able to utilize both monitors, by adjusting the following setting in Remote Desktop Connection app.
- Launch Remote Desktop Connection
- Click Show Options, click Display sub-menu
- Check Use all my monitors for this remote session

